Gift for a friend: Bedtime Bags

20130801-144901.jpg

The kids had a party on Saturday and I managed to make some gifts for our sweet friends. It is really hard to make gifts for people, I think. Most of the time you don’t have a lot of notice so not a lot of time to a) come up with an idea, and b) sew it up. These friends are very dear and I wanted their gift to be special, so I agonized a lot over it. In the end, an idea hit me: bedtime bags!

Bedtime gets harder as the kids get older, I find. At this point in the day, they are tired but wired; mine start running all over and shrieking too, which drives me crazy–I’m always scared they will fall and get hurt because they are not very coordinated at that time of day. Enter the bedtime bag.

20130801-145315.jpg

It is, basically, a bag where you put goodies that are used during your bedtime routine/allowed only at night, for easy access and to entertain the kiddos while you finish those last few tasks before lights off.

I made mine out of white cotton, using initial printables I found on Heather Ross’ Prints CD and ironed on. I filled it with some goodies my girls enjoy, and made a cute little tag for it. I also made a star stuffie to go with it. Cute!

20130801-145657.jpg

20130801-145714.jpg

I have a tag printable for you, if you wish to try out this idea:

Bedtime Bag Tag

Hawthorn!

20130728-165923.jpg

This is Hawthorn! When Sarai introduced the pattern she mentioned that girls trying it on described it as a “dream dress.” It’s true! This dress has such a flattering cut, yet it sits so comfortably on the body, it just makes you want to dance and twirl (I bet it’s that gorgeous circle skirt!)

20130728-170507.jpg

Mine is made out of a royal blue Swiss dot from Fabric.com, and underlined with china silk polyester lining, which was a small nightmare to work with, but gave my dress a lot of body. I only underlined the skirt and bodice pieces, and to do this I simply stay stitched them together, then treated them as one piece. Maybe next time I will just sew darts on the main fabric, then use that piece as pattern to cut the lining. The hems are finished by serger, thanks to the knowledge I am getting from Amy Alan’s fantastic Craftsy class, Beginner Serging.

The pattern is beautiful. There are several pieces, but the instructions are so clear that one is never at a loss what to do. One thing I learned from this process, which I had never really done, is to make sure that I really understand and have read the instructions several times. I used to “read while I sewed.” No more! It was so easy to sit down to sew, knowing I knew how to finish. The sewalong posts by Sarai and Rachel were a great help!

20130728-175611.jpg

I also learned how to use my buttonhole foot with this tutorial from the Five and Ten Designs blog, as well as a little help from my user manual. And, I learned to cover buttons with fabric, here. I love the look for this dress, because it uses 13 buttons, and I did not want contrasting buttons to compete with the texture of the fabric. I really like how it turned out.

I do have a little tutorial for you. This is how I made the sash to go with the dress:

20130728-180306.jpg

This tutorial was my inspiration, but I made a little alteration to cut only the ends of the sash on the bias, rather than the whole length of it, to save fabric but still achieve the same effect.

I loooove my Hawthorn. Thanks, Colette Patterns, for such a gorgeous dress!!

Hawthorn Dress Sewalong

Linking at:

The Train to Crazy

Little Sister/Big Sister Printables

20130719-221840.jpg

A few weeks ago, I hosted a baby shower for a friend and based it on the theme Little Sister/Big Sister.

20130719-221941.jpg

I really enjoyed planning with this theme since it is so close to my heart. I have two daughters (Big sister and Little Sister) and they make the world such a happy place for me! It is my wish that all sisters will share such joy 🙂

I made invitations:

20130719-222130.jpg

20130719-222144.jpg

20130719-222750.jpg

And outfits:

20130719-222227.jpg

20130719-222250.jpg

20130719-222308.jpg

And my daughters got so into preparations that they even colored some decorations for me!

I thought I would offer these printables as a free download. Enjoy your little girls, and sisterhood!

Sisters Printables

Flip this Pattern: The Roller Skate Dress (and KCWC day 4)

This month, the girls at Frances Suzanne have us all flipping the gorgeous Oliver + S Roller Skate Dress.

It is 9:30 p.m. EST and I am barely making the 11:00 p.m. CST deadline, but I made it!

20130718-213155.jpg

This is my 3-year-old (and Rapunzel) modeling size 4T for me. It was a beautiful pattern to work with. The construction was so interesting and fun; it reminded me a lot of the Ice Cream Dress. And, because of this clever construction, I was able to make the dress reversible with a change or two.

20130718-213704.jpg

The Fabric: The fabrics are a Black Chambray from Hart’s Fabric and a cotton lawn from Fabric.com.

The Construction: I used DMC silver metallic thread to embroider a Sashiko-inspired design on the neckline of the chambray side, in place of the facing.

20130718-214150.jpg

20130718-214203.jpg

To be able to make it reversible, I opted to have a ribbon closure, instead of a button with a loop.

20130718-214304.jpg

20130718-214313.jpg

20130718-215448.jpg

20130718-215459.jpg

Another problem I encountered was the casing. Since both my fabrics were so contrasting, I had a hard time figuring out what color thread to use for the casing. I finally decided to thread my machine with gray thread and sew the casing from the chambray side, while I loaded the bobbin with black thread so that the black would not show on the lawn side.

20130718-214540.jpg

Finally, I opted to hem by using a ladder stitch that I learned on my brief foray into toy-making. This stitch seemed perfect because it let me join both seams without having my stitches show anywhere, which was just what I wanted.

It was such a fun project to work with, and I can’t wait to make it again! My five-year-old needs one, too, but that did not stop her modeling this one. I love her props 😉

20130718-215036.jpg

20130718-215045.jpg

Thank you, FrancesSuzanne for the motivation to work with this lovely pattern! Also, thank you Megfor putting together KCWCthat is such an inspiration every time.
And, of course, thank you to Liesl Gibson for such a fantastic pattern!

Flip This Pattern

Hawthorn Sewalong

Hawthorn Dress Sewalong

For the past few weeks, I have been participating in the Hawthorn Sewalong over at Coletterie , and I am having an absolute blast.

When you open a Colette Pattern, you read “Patterns that Teach,” and it is so true. I have learned so much by following along (Thanks, Rachel and Sarai!) and by trying so hard not to rush with this but to take it as a process, I think I have become a better seamstress.

I am quite an impatient girl–I want results now. Yesterday. However, as with most things in life, in sewing the point is not only the dress but the process, because there is so much learning that goes on there. This has been the most important lesson I have learned so far: Take it as a process. When you first look at your pattern it is very easy to get overwhelmed, but if you take time to plan and schedule yourself, and complete steps one at a time, great things can happen. I have three children under five, one of them a seven-month-old, and finding time to sew has been a challenge; but, following along has been easy because it has been structured this way. I will approach any future project in the same manner!

Are you sewing along too?

20130718-015152.jpg
Here’s a little peak at my dress, only pinned in place because we have not done buttons yet–I am scared to make a selection of buttons and ruin the whole look if I choose wrong!!

Peanut Butter Cups

I found this amazing recipe for Peanut Butter Cups at the Heavenly Homemakers blog (which I love). It looked so yummy that I decided to make it for us:

20130716-220643.jpg

It was better than yummy! I made a few modifications to it:
-I am not using honey right now, so I added Truvia (but any other sweetener I am sure would work fine)

-I used unsweetened baking chocolate, then added Truvia and coconut oil, to both the chocolate and the peanut butter mixture. I think the coconut oil made it smoother and we were very pleased with the results. I just added oil by the spoonful until I liked the consistency. Here are some pictures of the process:

20130716-220955.jpg

20130716-221004.jpg

20130716-221015.jpg

20130716-221025.jpg

Give these a try, they are delicious! Thanks, Laura for the recipe!

(Let me know if you made them and how you liked them)

Children’s Books (literally!)

My girls and I have started working through Playful Learning , which is a wonderful book full of fun educational activities for children ages 4-8. My daughters are 5 and 3, but my three year old is enjoying the activities just as much, and I am having a blast seeing what those two can do!

20130714-152253.jpg

We made books the other day, one of the activities in the young authors’ section. I used this tutorial by Dana from Made, and then I just let them have a go. I was very impressed by the lovely stories they drew/wrote.

20130714-152625.jpg

20130714-152635.jpg

20130714-152645.jpg

My five-year-old wrote a book called “The Lemonade Stand,” full of creativity and wit! We are reading it at night before going to bed and she could not be more pleased. I loved working on this project together!

Linking at

I can Teach my Child!

Embellishments for baby garments

20130710-020537.jpg

Two of my friends are having/have had babies recently and I have been busy making gifts. I thought I would highlight some of the possibilities for baby sewing and gifting with easy, but pretty, embellishments.

20130710-020730.jpg

20130710-020745.jpg

Iron-on transfers are fantastic. There are a number of things you can do with them. In this case, I designed a little image of a big sister/little sister and colored it on the computer, then transferred that on to my fabric and added a bow for a cute, special outfit for a sweet pair of sisters.

20130710-020936.jpg

Fabric dyeing/painting lets you get just what you want. I used Dana’s dyeing tutorial and it could not have been more easy! I then drew the whales and painted them with fabric paint. Finally, I embroidered the water using a simple back stitch, and three strands of blue embroidery floss.

20130710-021259.jpg

Fabric painting is something I watched my mother do many times while growing up; but, quite honestly, I never had thought to translate it into everyday wear. This onesie could not have been more simple!

20130710-021445.jpg

I love how the boat image wraps around toward the back 🙂

20130710-021608.jpg

Embroidery is not something you associate with little boy clothes; but, as long as you are keeping it simple, it’s a great way to add a unique touch to any garment. Here, I back stitched the word “Ahoy” in keeping with my whale/nautical baby shower theme. A good tip is that, when you are ready to embroider on to any knit fabric, it is very useful to stabilize the fabric with interfacing. I ironed it onto the back and making the stitches was a breeze.

20130710-021851.jpg

How do you embellish clothes?

Linking at:

Sew Country Chick

Nap Time Crafters

Make your Getaway Duffle…

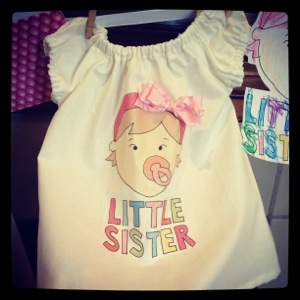
… You guessed it: Collegiate Style!

20130605-073724.jpg

I have had my eye on this pattern for a long time, back when I first started sewing after having kids and first started following blogs. Jess, from Craftiness is not Optional, had whipped up the most adorable bags for her daughters, and I just fell in love with them and the awesome pattern.

Here is my take on it:

20130605-074210.jpg

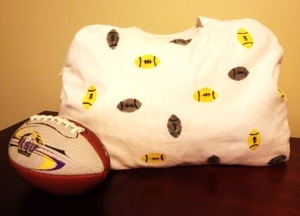
A couple of months ago we were taking our first trip with our new baby and the week before I realized the baby did not have a suitcase 🙂 So, you can see how quick this bag was to put together that I could do it even with my newborn at home and on a deadline! And, what’s more, I used all things I had at home to do it, so it was a super cheap project.

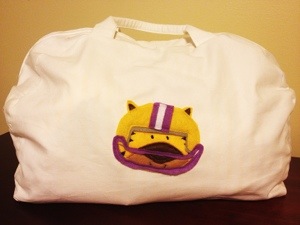
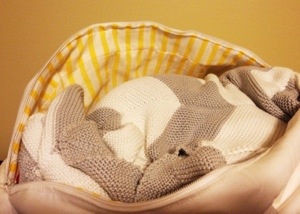
The fabric was a white twill canvas that I got at my local Hobby Lobby last year when I made the girls Valentine’s Day Drawstring Backpacks . The lining was leftover yellow and white striped cotton from Fabric.com that I had used for these skirts back during Fall KCWC last year. The appliqué was put together from scraps of felt I had around, and the football stamp came from a potato.

20130605-075214.jpg

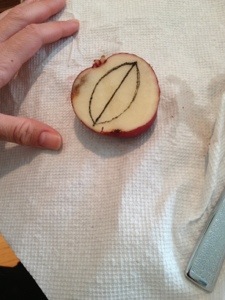
That is what my stamp looked like. Please, ignore the random brown spot on my potato… It was all I had on hand at the time! Anyway, I traced the football shape on to the potato half and carved it out with a knife. Then, I painted onto my fabric pattern piece.

20130605-100308.jpg

The other side features a tiger appliqué, with embroidered face and stripes. My husband supervised the colors in the helmet to ensure that our tiger would end up being Mike the Tiger, the LSU mascot, and not a Mizzou Tiger 😉 (sorry, Mizzou fans!)

20130605-100544.jpg

I loved loved loved this pattern, and have plans to make one for each of us. It was incredibly easy to make and it is incredibly roomy.

20130605-100658.jpg

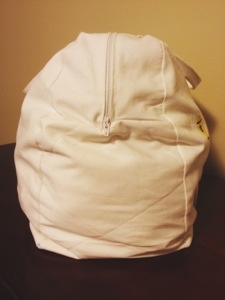
I made the adult size for the baby because we always have to carry so much for the little ones, and I think it could easily accommodate a well-packed adult for the whole weekend. I pack toiletries and shoes separately, so I think the one bag could hold all my stuff for a week! It is very sturdy and comfortable to hold. The pattern instructions are super easy to follow, and it even includes some troubleshooting tips for issues that can come up while sewing the bag, which were extra helpful to me. This is the second pattern of Gingercake’s that I sew, (I blogged about the first one here ) and I liked it just as much as the first.

20130605-100915.jpg

I loved working on this project and would recommend it to anybody looking for a stylish duffle bag to make. Thanks to Virginia from Gingercake Patterns for creating such an awesome pattern!

Linking at:
So you think you’re crafty

Nap Time Crafters

Sew Much Ado

Pattern testing: Peek-a-boo Pattern Shop’s Ringer Tee

20130530-105238.jpg

A few months ago, I had the opportunity to test the fabulous Classic Ringer Tee Pattern by Amy from Peek-a-boo Pattern Shop. I had always dreamed of testing out a pattern and it was such a fun opportunity at a time when I was so stressed out by RL, a much needed break 🙂 Thanks, Amy!

Now, this pattern is the perfect blank canvas for any kind of customization you can dream of. I am still getting the hang of sewing for my baby boy, so my ideas immediately ran to football since it is such a big part of our family’s favorite things. We are LSU Tiger fans so I thought a classic LSU tee was in order.

Cherie from You and Mie had given me the inspiration to try and paint some fabric, and I finally got to do it for this project.

20130530-110046.jpg

I basically just painted purple stripes, the width of my brush, all over the long sleeve pieces.

20130530-110152.jpg

I then dunked the cuffs and neck band in the leftover paint and let it all dry, then constructed the t-shirt per the pattern instructions. It was a breeze!

20130530-111332.jpg

20130530-111412.jpg

Amy had a very clever way of attaching neck bands and cuffs, and the result was very nice–and very easy to make. It came together pretty quickly.

Then, I added a football appliqué with felt, lettering with transfer paper, though my transfer did not work very well with the rib knit fabric I had chosen… You live, you learn, right?

20130530-110647.jpg

20130530-110703.jpg

See? And, half my family got the flu that week. I was on a deadline, however, so I tried to stitch in the dark as I watched them to avoid bothering anyone, thus my stitching is less than even… Thank goodness that baby can’t tell 😉

20130530-110915.jpg

And here is a shot of my little guy wearing it. I love how boyish and cute it turned out!

Linking at:
The Train to Crazy

Nap Time Crafters